|
|
2-frequency 2-meter domeFor individual or small groups of students |
We
move next into building a larger scale, more spherical dome. The
plans presented here are for a dome with a radius of 1 m, so the
finished dome is 2 meters across. A dome with a radius of 1 meter will be
about 6 feet across when assembled, and will be useful for large-scale
demonstrations or small model planetariums. It is not large enough
to have more than a few students sit inside when completed (unless
your students are very young!) Materials needed:
You will need to use stronger materials
than paper or construction paper. Posterboard might be strong enough
if the dome is carefully assembled. Fibreboard, such as is used for
science fair displays, is suitable. The best kind of cardboard is
corrugated cardboard because of its strength. Cutting corrugated
cardboard isn’t easy and scissors are probably not the best
tool to use. In some cases, if you use box cutters to cut one side
of the cardboard following a straightedge, you can fold the cardboard
along the cut and just snap it apart. Otherwise, turn the cardboard
over and fold it into a V-shape, then cut in the narrow channel that
results. If fiberboard is used and it has only
one white side, be sure to make the white side the interior of the
dome so it doesn’t need to be painted. If you have access to
a paper manufacturing facility, sometimes cardboard can be purchased
with one side already made white for producing white cardboard boxes.
Such cardboard typically comes in 4 x 8 foot sheets, and you should
take care not to bend it until absolutely necessary in order to retain
its strength. It is entirely possible to build the dome out of scrap
cardboard from a variety of boxes, and a grocer or warehouse store
probably has lots of boxes they would be willing to donate to your
project. If you don’t have white cardboard,
you should paint one side of the cardboard white with any white flat
paint. See painting tips for other hints, but for now it is best
to note that painting is probably best done before the cardboard
is assembled into a dome. The connecting flaps do not need to be
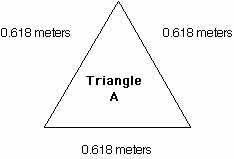
painted. Procedure: 1. The first triangle is an equilateral triangle with each side equal to 0.618 meters, or 61.8 centimeters. Do not leave any extra cardboard for connecting flaps. This will be called triangle A. Make one of these.
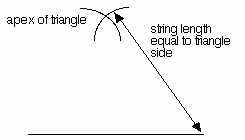
One way to make the template accurately for these triangles is to use an old geometry technique. First, draw the base the triangle with a pencil and ruler. Next, measure a length of string equal to one of the remaining sides, and draw an arc centered on one end of the line you drew. Repeat on the other side, and where the arcs cross must be where the top of the triangle is located.
3. Once you have the templates made, assemble enough
cardboard to make the remaining triangles. You will need to make
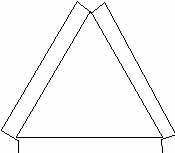
10 A-type triangles and 30 B-type triangles. The connecting flaps for this dome will need to be folded carefully
so they bend straight. In this case score the cardboard by drawing
a heavy line with a ball-point pen (not a felt-tip) which will weaken
the bending joint. Then bend the cardboard along the line you drew
to make a flap or other junction. Don’t be afraid to practice
on some scrap before committing yourself to a more permanent part. 4. At this point you must decide and commit to
using a particular method of attaching the flaps together. You need
to decide if you want to use nuts and bolts or binder clips. 5. To assemble the dome using your chosen method of assembly, begin by building a pentagon of 5 B triangles, with the long sides all on the outside . Leave the last joint unconnected until last to make the assembly easier.Connect the last two interior sides together to make a little “cap” or bowl shape. 6 . Make 5 more of these pentagon shapes.Set one
of the pentagons aside. 7. Set 5 pentagons into a circular pattern on the
floor, stand two at a time up on one edge, and insert an “A” triangle
between them. If you are working alone, having lots of chairs around
to brace things is helpful. 8. Insert another “A” triangle into the gaps at the tops of the pentagons, this time with the point of the “A” pointing downward. Finally, set the remaining “B” triangle pentagon into the remaining hole and attach with clips. Again, two people working at once is much easier, especially on the larger domes . Congratulations! You have assembled your 2-frequency geodesic dome! Here is a photo of an assembled 2 meter dome with flaps inward. |
Overview
Building a Dome
Desktop
2 Meter
5 Meter
Paint Your Project
Making a Projector
Using the Planetarium
Curriculum
Assessments
Resources
Safety
Feedback
Quick Links
Deer Valley High School Science Department
Contact Us
Site counter courtesy of www.digits.com This project was supported by a County Technology Academy Grant funded by the Dean and Margaret Lesher Foundation in cooperation with the Contra Costa County Office of Education. |


