Building
a projector is essential to using the planetarium dome to teach a
number of lessons including the diurnal (daily) motion of the sun
and stars, the dependency of the sky’s appearance on latitude,
and more.
Fortunately it is relatively easy to
build a projector. High quality projectors are also available from
sources such as MMI Corporation and Learning
Technologies. The projector
we will describe is not as good as these projectors, but it will
be better than the toy projectors you find in toy stores, intended
for use on a darkened bedroom ceiling.
With some effort and advanced skills it
would be possible to build an extremely advanced projector. Some
of the considerations needed for such a project will be discussed
along the way, but only the basic projector will be fully described.
Recently the cost of digital projectors are falling to the point where you may be able to afford one. If so, several programs such as Starry Night, Celestia, The Sky, Redshift, Voyager, and others could provide a digital image for your dome. For a more complete listing, visit AstronomyTeacher.com, click on Links, and then click on Software.
Purpose: Build an adjustable projector useful for showing the positions of stars.
Materials:
| 3 + laser printer transparencies | templates from this site |
| use of a laser printer | coat hanger |
| small light bulb | socket |
| wire | lazy susan |
| 2 square pieces of plywood 1 square foot each | hinge |
| screws | hammer |
| scotch tape | duct tape |
| small plastic bowl | permanent black marker |
| electrical tape | 3 + velcro attachments |
Optional: lightly tinted transparent plastic sheets such as from an envelope window.
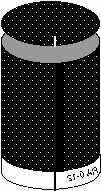
1. At the following links you will find two star charts one for the cylinder walls the other for the lid.
Click on the file name below to access files:
Please note these are proof-of-concept images and are not the finished version.
These are still under revision and someday will include several variations.
You need to print these out on transparencies using a good quality
laser printer. Consult your printer manual to find out how to
properly load the laser transparencies
into the printer. It may also work (but not as well) to print the masters
out on paper and use a photocopier to make the masters. In any case, make
sure you use transparencies designed for the printer or copier you are
using. Thermal transparencies, for example, will melt onto the
print cylinder of
a copier and cause expensive repairs to be needed.
2. Identify which side of the transparency is the “inside” and which is the “outside.” The inside of the transparency has letters written normally. The outside of the transparency will have the letters written backward.
3. Carefully trim the clear borders from each transparency, except for the bottom. Cut slowly and precisely.
4. The Wall gets assembled into a cylinder and the cap fits on top.

5. Use very small pieces of electrical tape to secure the cylinder lid to the cylinder. Using very small and narrow pieces of electrical tape, work your way around the cylinder lid, trying not to cover any bright stars on the charts as you go.
8. Snip notches in the bottom of the clear section remaining on the cylinder maps, so that the resulting tabs can be folded outward. These will be used to secure the cylinder to the projector with velcro, so you can put the loop pieces of velcro on the inside (bottom) of the clear tabs you have made.
9. Use a permanent maker to eliminate any scratches, including the alignment mark on the round chart. Your projection cylinder is now complete.
Tips: Use a laser printer set to maximum darkness to make the cylinder.
Consider printing a negative version of the cylinder with clear walls and use dark lines with clear background.
Click here for a printable version